Many thanks to Don Walterman for these instructions, telling you exactly how to upgrade your Z88's internal RAM to 128K or 512K. Not for the faint-hearted!
If you'd like to expand your Z88's RAM, but don't have the skills to attempt the job yourself, contact Tony Firshman, who can perform the upgrade for you.
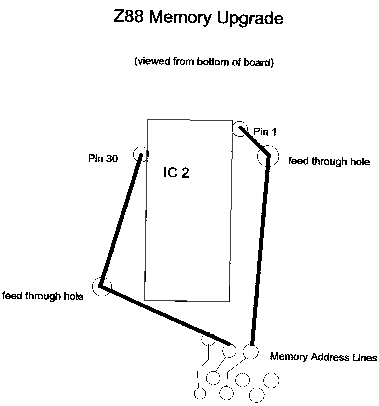
Tony also reports an omission in these instructions: pin 30 must be bent out, or the PCB modified (this pin is the +5v line for the 32K RAM).
Don has recently discovered that some people have problems with the 512K upgrade. He has a possible fix, so if you are having difficulties please email him.
I've always wanted to add memory to the Z88. I got started with the Z88 a bit late in its life, so a lot of the products I read about were no longer available. Reading back through old magazines, I noticed some advertisements for internal memory expansion kits. Since none of them are available anymore, I decided to make it a do-it-yourself project.
I started with the Z88 service manual. It explains that the internal memory is pseudo-static memory. This type of memory is not common. I did manage to find one advertisement for it. The company is Microprocessors Unlimited in the USA - tel (918) 267-4961. They stock both 128K and 512K pseudo-static memory that's perfect for the Z88 (80ns or 100ns will work fine).
Back to the service manual - it also explains that the memory socket is pinned for the 128K memory chip. The only problem is that every Z88 board I've looked at has the memory chip soldered in. Some of you may be lucky enough to have a socketed chip, but don't expect it. Carefully unsolder the old memory chip and install a low-profile socket. Make sure to use a 32-pin socket. You will need to clean out the extra four holes above the 32K RAM, which only uses 28 pins.
I tried the 128K chip first, and it worked right away. The Z88 recognised it without doing anything special. I installed the 512K chip and it only saw the first 128K. Back to the service manual.
The service manual explains that the Z88 is designed to access four blocks of one megabyte each. To access the full one megabyte, you need to use all the memory address lines. Memory address lines 17 and 18 don't go to the internal RAM socket. They do go to each of the option card connectors. It happens that there are three pads by each connector. Use the two pads next to each other that go to the second and the third pin from the end of the connector. These pads are memory address lines 17 and 18. They are perfect for this project. Solder a wire to each pad on the foil side of the board. Make sure your wire doesn't go through the pad too far. There is a metal bar that too long a wire could short against.
There are a number of feed-through holes on each side of the internal RAM chip. I prefer the feed-through hole by pin 3 of the memory chip and the feed-through by pin 18 of the memory chip. This allows you to run the wire right to the pins you want. Don't solder the wire to the feed-through holes. Just run the insulated wire through it. Feed one of the wires through each feed hole. Don't use too much wire - you want to make sure none of the wires interferes with the option slots. I left pins 1 and 30 bent out of the socket so that it would be easy to solder the extra memory lines on.
After attaching the two memory lines, the Z88 woke up with 512K. It recognised all of it with no problems - despite reports that a v4 ROM is required for 512K internal memory.
One last detail - the clearance under the keyboard is tight. When I put the Z88 back together, I noticed the keyboard bent a little. Then I looked at the bottom of the keyboard, and I saw that there was a clear space above the Z88 ROM. Use a sharp pair of wire cutters to trim the area on the bottom of the keyboard above the RAM just like it is over the ROM. Now the keyboard fits well. This is why it's better to use a low-profile socket if you have one.
Enjoy this simple do-it-yourself project. The only hard part is unsoldering the old RAM chip. Be careful and you'll be successful. If you aren't good at soldering, please ask someone who is. This is a great way to cheaply upgrade your Z88.
A few notes: make sure to completely backup your Z88 before starting this project. You will probably need to do a hard reset to get the Z88 to check to see how much memory is installed. Don't be surprised if the Z88 makes a strange noise the first time you turn it on. Just perform a hard reset and it will be fine after that.
I didn't have time to make a fancy drawing of how to do this. I've included a basic diagram that should help.
My next project is to add two 512K RAM chips to an option slot. It should be possible to make a one megabyte board for about $60. The connector is a challenge though...